Binding a List Request Parameter on Spring MVC

Here’s another handy stuff I found on Spring MVC, if you have an unknown number of elements on your form (say a fruit basket), you can bind them into a List with @RequestParam annotation.

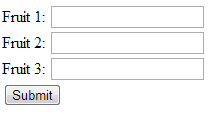
Let’s say this is our form:
spring-bind-list

Each text input has the same name fruits:

<form method="post">
  Fruit 1: <input type="text" name="fruits"/><br/>
  Fruit 2: <input type="text" name="fruits"/><br/>
  Fruit 3: <input type="text" name="fruits"/><br/>
  <input type="submit"/>
</form>

On your controller’s handler method, you can obtain the list of all fruit names by binding it like this:

@RequestMapping(value = "/", method = RequestMethod.POST)
public String addFruits(@RequestParam("fruits") List<String> fruits) {
  // ...
}

The order of fruit names added to the list will be the same as the order of your form text inputs.
mount.nfs: Input/output error When Mounting From CentOS 5.9 to 6.4

Was trying to mount a NFS shared folder on CentOS 6.4 from CentOS 5.9 and found a really tricky problem. I’ve added the /etc/fstab entry, but once I ran mount /my/folder it stuck for 2-3 minutes and came back saying

mount.nfs: Input/output error

Things I’ve Tried

This is all the things I’ve tried with no success:

  • Ensured network connection was ok. I checked the firewall / iptables and made sure the client machine can connect to NFS server
  • Checked my /etc/hosts file, ensured no dodgy entries
  • Double checked /etc/exports and ran exportfs -r on the NFS server
  • Ran showmount -e [host_ip] to check the NFS server really does advertise the shared folders
  • Ran rpcinfo -p [host_ip] to check the version and supporting services are available
  • Rebooting the server many times

Solution

Thanks to this post from linuxquestion.org forum, the solution was to add nolock option to the /etc/fstab file.

10.0.10.10:/my/folder /mnt/nfs/my/folder nfs nolock 0 0

CentOS manual is pretty vague as well on what this option really does, but oh well it seems to do the job for time being

nolock — Disables file locking. This setting is occasionally required when connecting to older NFS servers.

CentOS / RHEL NFS Share Network Folder Mounting

Scenario

We are building a second web server with a hope of installing a load balancer soon. We came into a problem where we have to synchronize the file contents between multiple servers. The solution we’re opting is to install and mount a shared network folder (NFS) visible from both web servers. The shared folder lives on its own server (aka file system server).

It is assumed:

  1. The file system server host (Master) is 12.0.10.10
  2. The client is 12.0.20.20
  3. The folder to be shared on master is /var/www/vhosts
  4. The folder will be mounted to /mnt/nfs/var/www/vhosts on client

Creating a NFS Share on the File System Server

Perform these steps on the file system server (aka “Master”):

  1. Install nfs-utils and nfs-utils-lib package using yum:
    yum install nfs-utils nfs-utils-lib
    Use yum list installed to check if the packages are already installed
  2. Turn on nfs service so it automatically starts on boot
    chkconfig nfs on
    Use chkconfig --list to check status of all services
  3. Start rpcbind and nfs service
    service rpcbind start
    service nfs start
  4. Edit /etc/exports file and add following line at the end
    /var/www/vhosts 12.0.20.20(rw,sync,no_root_squash,no_subtree_check)
    See here for explanation of the options
  5. Run following command to apply the changes
    exportfs -a

Mounting it on the Client

Following steps will mount the network folder permanently (folder will automatically re-mount on server reboot). Perform this on the client server:

  1. Similar to server, ensure nfs-utils and nfs-utils-lib are installed
    yum install nfs-utils nfs-utils-lib
  2. Create the directory that will hold the mount (mount point)
    mkdir -p /mnt/nfs/var/www/vhosts
  3. Edit /etc/fstab file and append following line
    12.0.10.10:/var/www/vhosts /mnt/nfs/var/www/vhosts nfs defaults 0 0
  4. Run mount /mnt/nfs/var/www/vhosts to apply the mounting. Check if the mounting is successful using df -h

OS User on Master and Client

To ensure file system operations are consistent, consider propagating same OS user setup between the master and client. Note that although same username exists on both master and client they don’t necessarily have the same UID.

  • Checking uid and group of user jim:
    $ id jim
    uid=506(jim) gid=505(xyzco) groups=505(xyzco)

    (jim has uid 506 and belongs to group xyzco)
  • Adding a new user jim with uid 506
    useradd -u 506 jim
  • Adding jim to the group xyzco
    usermod -G xyzco jim
  • Setting / resetting password for jim
    passwd jim

Thanks To

Additional Reading

Git Cheat Sheet

Deleting Remote Commits

Assuming the remote repository has been cloned locally and the remote repository name is origin

  1. Delete all local modification using git reset -- <file> ...
  2. Delete the latest commit locally using git reset HEAD^ --hard
  3. Synchronize it to remote using git push origin -f

Thanks To

Managing Services on UNIX Using chkconfig

A typical unix service-related command looks like this

# start mysql service
service mysqld start

# stop mysql service
service mysqld stop

The list of currently configures service can be viewed using chkconfig command

[root@somehost ~]# chkconfig --list
...
ip6tables       0:off   1:off   2:on    3:on    4:on    5:on    6:off
iptables        0:off   1:off   2:on    3:on    4:on    5:on    6:off
messagebus      0:off   1:off   2:on    3:on    4:on    5:on    6:off
mysqld          0:off   1:off   2:off   3:off   4:off   5:off   6:off
netconsole      0:off   1:off   2:off   3:off   4:off   5:off   6:off
netfs           0:off   1:off   2:off   3:on    4:on    5:on    6:off
...

Each of the number 0-6 corresponds to different OS runlevel.

To disable/enable mysqld service, use following command

# disable mysqld
chkconfig mysqld off

# enable mysqld
chkconfig mysqld on

By default chkconfig on/off will set the service into 2-5 runlevel.

Backing Up and Restoring MySQL Database Using mysqldump

Although not always the most efficient, mysqldump is a handy way to migrate your MySQL server — particularly if you don’t have many schemas and the size of data is small.

To create backup, first list all schemas on the server using

SHOW DATABASES;

I normally avoid backing up performance_schema, information_schema and mysql schema. They contain database configuration, user settings etc. This would mean you have to reconfigure all your settings on the new server

Then take the dump of all schema using this command:

mysqldump -u***** -p***** --databases <space_separated_schema_names> > mybackup_20131107_1223.sql

Then compress, transfer and inflate the sql file into the new server’s host. When you’re ready to restore, just do

mysql -u***** -p***** < mybackup_20131107_1223.sql