CentOS / RHEL NFS Share Network Folder Mounting

Scenario

We are building a second web server with a hope of installing a load balancer soon. We came into a problem where we have to synchronize the file contents between multiple servers. The solution we’re opting is to install and mount a shared network folder (NFS) visible from both web servers. The shared folder lives on its own server (aka file system server).

It is assumed:

  1. The file system server host (Master) is 12.0.10.10
  2. The client is 12.0.20.20
  3. The folder to be shared on master is /var/www/vhosts
  4. The folder will be mounted to /mnt/nfs/var/www/vhosts on client

Creating a NFS Share on the File System Server

Perform these steps on the file system server (aka “Master”):

  1. Install nfs-utils and nfs-utils-lib package using yum:
    yum install nfs-utils nfs-utils-lib
    Use yum list installed to check if the packages are already installed
  2. Turn on nfs service so it automatically starts on boot
    chkconfig nfs on
    Use chkconfig --list to check status of all services
  3. Start rpcbind and nfs service
    service rpcbind start
    service nfs start
  4. Edit /etc/exports file and add following line at the end
    /var/www/vhosts 12.0.20.20(rw,sync,no_root_squash,no_subtree_check)
    See here for explanation of the options
  5. Run following command to apply the changes
    exportfs -a

Mounting it on the Client

Following steps will mount the network folder permanently (folder will automatically re-mount on server reboot). Perform this on the client server:

  1. Similar to server, ensure nfs-utils and nfs-utils-lib are installed
    yum install nfs-utils nfs-utils-lib
  2. Create the directory that will hold the mount (mount point)
    mkdir -p /mnt/nfs/var/www/vhosts
  3. Edit /etc/fstab file and append following line
    12.0.10.10:/var/www/vhosts /mnt/nfs/var/www/vhosts nfs defaults 0 0
  4. Run mount /mnt/nfs/var/www/vhosts to apply the mounting. Check if the mounting is successful using df -h

OS User on Master and Client

To ensure file system operations are consistent, consider propagating same OS user setup between the master and client. Note that although same username exists on both master and client they don’t necessarily have the same UID.

  • Checking uid and group of user jim:
    $ id jim
    uid=506(jim) gid=505(xyzco) groups=505(xyzco)

    (jim has uid 506 and belongs to group xyzco)
  • Adding a new user jim with uid 506
    useradd -u 506 jim
  • Adding jim to the group xyzco
    usermod -G xyzco jim
  • Setting / resetting password for jim
    passwd jim

Thanks To

Additional Reading

Managing Services on UNIX Using chkconfig

A typical unix service-related command looks like this

# start mysql service
service mysqld start

# stop mysql service
service mysqld stop

The list of currently configures service can be viewed using chkconfig command

[root@somehost ~]# chkconfig --list
...
ip6tables       0:off   1:off   2:on    3:on    4:on    5:on    6:off
iptables        0:off   1:off   2:on    3:on    4:on    5:on    6:off
messagebus      0:off   1:off   2:on    3:on    4:on    5:on    6:off
mysqld          0:off   1:off   2:off   3:off   4:off   5:off   6:off
netconsole      0:off   1:off   2:off   3:off   4:off   5:off   6:off
netfs           0:off   1:off   2:off   3:on    4:on    5:on    6:off
...

Each of the number 0-6 corresponds to different OS runlevel.

To disable/enable mysqld service, use following command

# disable mysqld
chkconfig mysqld off

# enable mysqld
chkconfig mysqld on

By default chkconfig on/off will set the service into 2-5 runlevel.

VirtualBox, Ubuntu and LAMP Stack

Came accross VirtualBox, a free & excellent virtual machine software. I decided to take it for a spin creating a Ubuntu virtual machine LAMP stack on it..

Here We Go

  1. Download and install VirtualBox
  2. Download latest Ubuntu iso installation file
  3. From VirtualBox create a new Virtual Machine. Select type: Linux and version: Ubuntu. On the next step you will be prompted with dvd drive containing the installaion disk, but instead just select the iso downloaded on step 2
  4. Go through the Ubuntu installation steps
  5. It’s also very helpful to install ssh server so you can ssh into your VM later on: sudo apt-get install openssh-server

Voila! You have ubuntu running on your Windows PC

Host and Guest

In virtualization realm, host indicates your physical PC (Windows 7 in my case), and guest is the virtual machine (Ubuntu). Most of virtual machine software documentation uses host and guest terminology heavily so make sure you’re familiar with it

Networking

This is where things get tricky. Virtual machine comes with virtual network adapters, and you have to do few configuration to setup connectivity between your virtual and physical adapters.

By default VirtualBox allows the guest machine to connect to the internet through NAT, so you can download data, browse internet etc. However if you want to run servers from the guest, it won’t be discoverable by the host or other PC in the host’s network immediately.

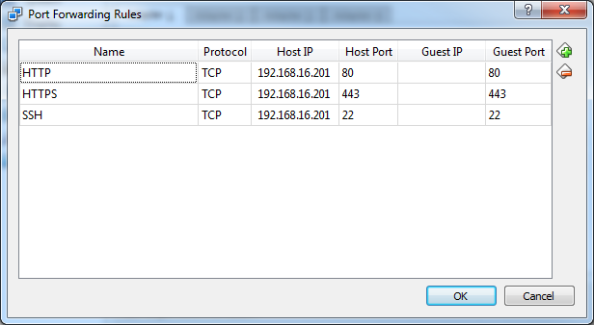
One approach to make them discoverable is by setting up port forwarding. You get here by going to networking section on the machine’s setting on Virtual Box

portforwarding

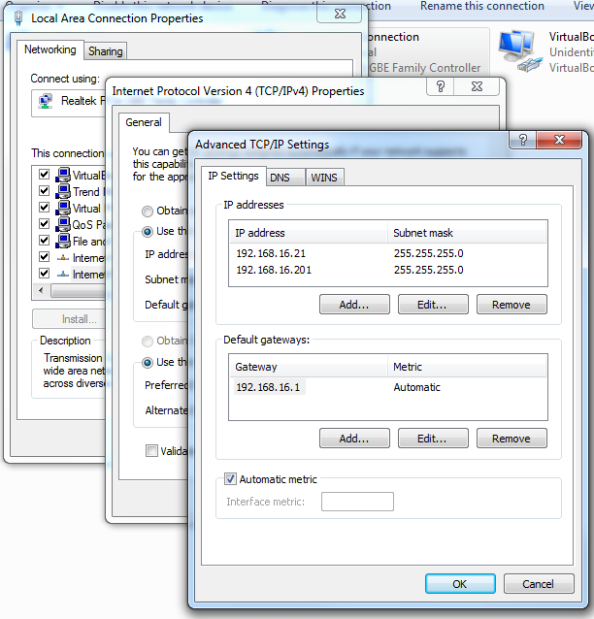
Note that setting port forwarding requires the port is actually free on your host machine. Hence I find it very useful to add an IP to your host’s network interface specifically for the VM so you don’t have port conflicts. In this example I added the IP 192.168.16.201 on my interface:

addip

The “AMP”

So there’s the “L – Linux” done. Now for the Apache, Mysql and Php, it can simply be done by using Ubuntu’s apt-get package manager:

  1. Open a terminal / SSH session to your Ubuntu machine
  2. Elevate into root using sudo su root
  3. apt-get install apache2
  4. apt-get install php5
  5. apt-get install mysql-server mysql-client

Few helpful notes:

  • Default doc root is /var/www
  • To start / stop apache: sudo service apache2 stopsudo service apache2 start
  • To start / stop mysql: sudo service mysql stop / sudo service mysql start

Mitigating DoS Attack Using iptables

Continuing from my earlier post about iptables basics, the limit module of iptables can be used to mitigate DoS (Denial of Service) attack. Note that mitigating here means “reducing the damage”. The worst scenario is under a heavy DoS you can’t even SSH and run commands on your server. With iptables you can limit the frequency of packets — enabling you to SSH and take appropriate actions.

Following are the rules I currently use. This will only allow new incoming TCP connection on port 80 & 443 with specified frequency (see limit explanation below):

iptables -A INPUT -j ACCEPT -p tcp --dport 80 -m state --state NEW -m limit --limit 40/s --limit-burst 5 -m comment --comment 'Allow incoming HTTP'
iptables -A INPUT -j ACCEPT -p tcp --dport 443 -m state --state NEW -m limit --limit 40/s --limit-burst 5 -m comment --comment 'Allow incoming HTTPS'
  • -A INPUT: Append to the end of a chain called INPUT
  • -j ACCEPT: When rule match, accept the packet
  • -p tcp: Match only TCP protocol
  • –dport: Match given TCP port
  • -m state: Use the state module
  • –state NEW: Match only packets initiated from new connection. This rule will not match packets exchanged from an existing connections.
  • -m limit: Use the limit module
  • –limit 40/s: If more than 40 packet per second received, decrement one burst point. If no more burst point, reject the packet
  • –limit-burst 5: The initial number of burst point. A “burst” occur when the limit above is reached. On a period where limit is not reached, one burst point is regained, up to this maximum limit. If burst point is 0, subsequent burst will cause the current rule matching to fail — and iptables will try the next rules (if you setup iptables properly the packet should slip through to ‘reject all’ rule)

Add following rule to allow your program making connection to localhost (loopback interface)

iptables -A INPUT -i lo -j ACCEPT

I then append a rule to match packets exchanged from established / related connections. This is important so packet resulted from outbound connections are accepted:

iptables -A INPUT -j ACCEPT -m state --state RELATED,ESTABLISHED -m limit --limit 100/s --limit-burst 50

And finally, reject all packets not accepted by above rules. Be careful before you do this, make sure you’ve added rules to allow SSH (port 22) so you don’t lock yourself out.

iptables -A INPUT -j REJECT

Testing And Continual Adjustment

Finding the correct number for limit and burst could be hard, but what I find useful is to perform continuous monitoring and adjustment. Keep in mind your goal here is to ensure maximum capacity of the server is utilised while protecting it against DoS. One approach I like is to use the iptables LOG target. Assuming I add following rules:

iptables -A INPUT -j ACCEPT -p tcp --dport 80 -m state --state NEW -m limit --limit 40/s --limit-burst 5
iptables -A INPUT -j LOG -p tcp --dport 80 -m state --state NEW --log-prefix 'TCP 80 Burst Exhausted'

If the first rule did not match (eg: because of burst is exhausted), the LOG rule after it will match and print into your syslog (typically /var/log/messages) with prefix “TCP 80 Burst Exhausted”. LOG target will not accept / reject the packet — after logging, iptables will continue checking the subsequent ruless.

The neat thing here is you can grep ‘TCP 80 Burst Exhausted’ /var/log/messages to detect when was last time suspected DoS attack occured. If the suspected attack is determined to be false alarm, your limit and burse setting is too strict, and you should gradually increase it.

Saving and Restoring

Updating rules at specific order can be very tedious, you have to count the terminal screen lines, insert the new rule, delete the old one and so on. There’s one trick you can do, that is to leverage iptables-restore command. Everytime you save the rule using service iptables save /etc/sysconfig/iptables file is updated with your rule specification. You can update this file and restore it using iptables-restore. Beware! A syntax error will cause your rule to be skipped. It’s best to test your command first by adding it to the bottom, and use this method to re-order the rules.